It’s fun to change WordPress theme. It may refresh your site, improve user experience, and align your online presence with your business identity.
However, moving WordPress themes might be scary since you may lose your customized settings and functionality.
Luckily, there are ways to streamline this move. With thorough solutions, this post will help you migrate how to change WordPress themes without losing content.
Can you change WordPress theme without losing data?
If done correctly, switching WordPress themes is usually a smooth procedure that doesn’t result in any content loss. To prevent any possible problems, it’s essential to adhere to best practices and make sure you have adequate backups in place. This is a detailed guide that will show you how to switch WordPress themes without losing any data.
The correct method for changing a WordPress theme
1. Set up a staging site
Establishing a staging site—a precise replica of your website—is a smart idea before making any modifications to your actual website. This lets you test out theme modifications without having an impact on your live website.
To set up a staging site:
Use hosting feature or a staging plugin
A lot of WordPress hosting companies include staging site features in their hosting packages. It is accessible to be enabled through your hosting dashboard. If staging is not offered by your hosting company, you can utilize a staging plugin such as “WP Staging” or “Duplicator“.
Keep scrolling to discover additional information about staging sites.
Test your staging site
On your staging site, you can now install and activate the new theme and test it to make sure everything functions as it should.
2. Install and activate a new theme
Once your staging site is up and running, you can install and activate a new WordPress theme. To carry out this:
- Open the WordPress Admin Dashboard and log in.
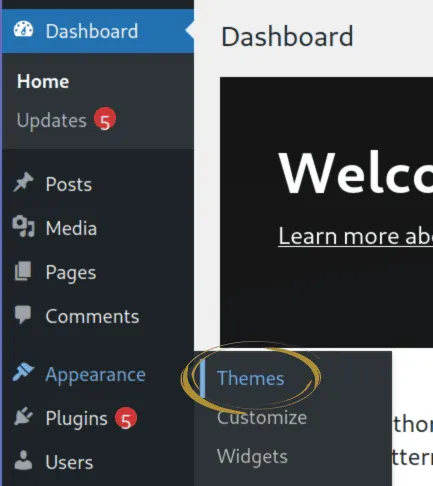
- Go to “Appearance” in the sidebar on the left, then click “Themes“.
- Press the “Add New” icon.
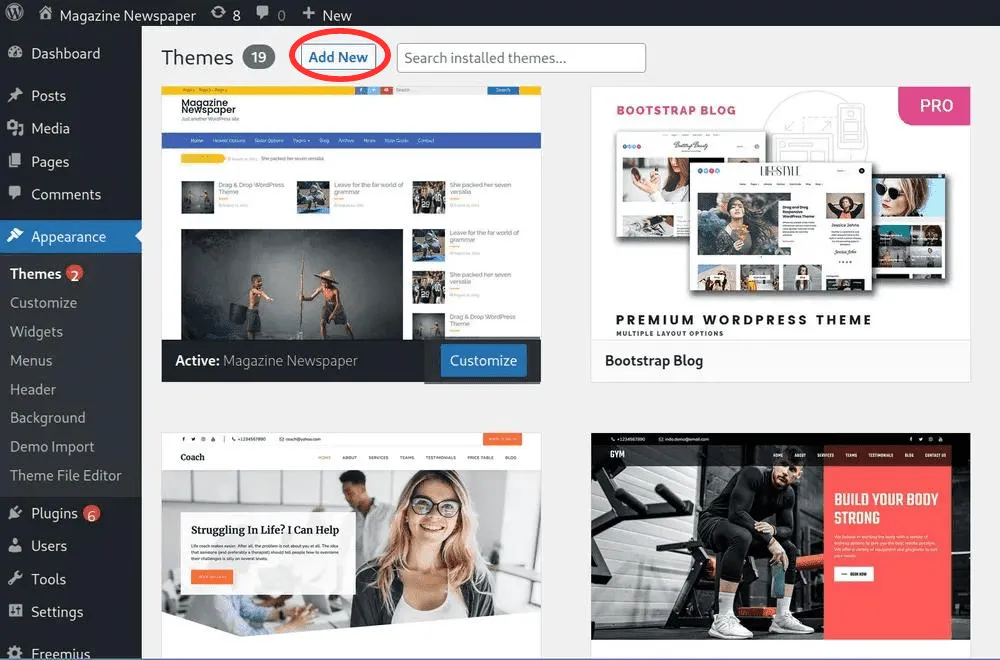
- Use the browser to look for and install the desired theme. If you have a theme saved in a ZIP file, you can upload it or utilize the search bar.
- After selecting your preferred theme, click “Install” to let WordPress handle the installation.
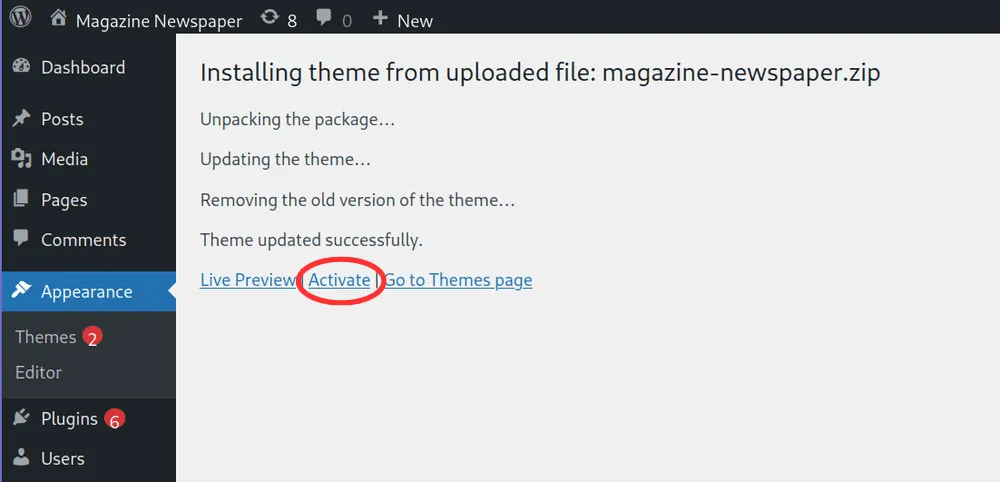
- To make the new theme your active theme, click the “Activate” button once the installation is finished.
3. Preview new design in Customizer and resolve errors
It’s time to check out the new layout and fix any possible problems now that your new theme has been installed and enabled. Without making your changes public, you may use the WordPress Customizer to make changes and see a real-time preview of how they will impact your website.
To see a sample of your new theme and fix any issues:
- Click “Appearance” in the WordPress dashboard, then choose “Customize“.
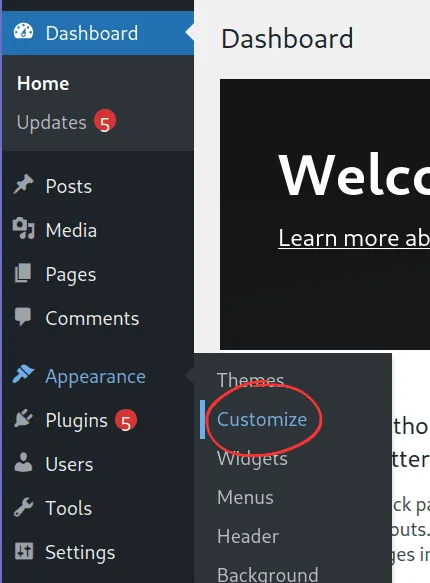
- You’ll notice possibilities to change your theme’s colors, fonts, widgets, and other elements. Adjust as needed, then watch the real-time preview.
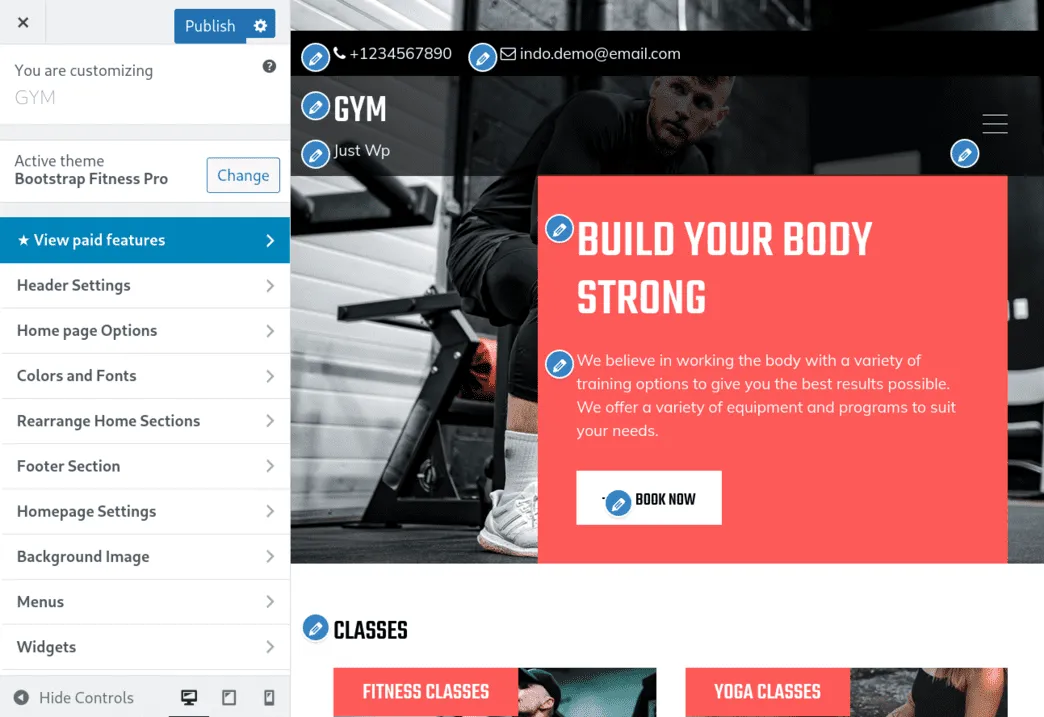
- You can either change the settings in the Customizer or contact the theme’s support team or documentation if you run into any problems or mistakes throughout this process.
4. Preview new design without Customizer
Even while the Customizer makes previewing theme changes easy, you might wish to view your site without the Customizer before going live. To carry out this:
- Use the incognito browser window to access your website or log out of your WordPress admin panel.
- Browse your website to ensure that the new theme is displaying appropriately and that all of the features and content are present.
- Before moving on to the next phase, you should take care of any issues you find, such as broken or missing content.
5. Deploy your new site to production
When you have fixed any bugs and are happy with your new theme, it’s time to publish the modifications to your live website.
- When your hosting provider includes a staging environment in their hosting service, use your hosting dashboard to move your staging changes to production.
- Alternatively, use migration plugins to migrate your hosting changes to production.
Your WordPress theme has been successfully switched, giving your website a brand-new appearance without erasing any content.
Backup Your Website: Ensuring Data Security
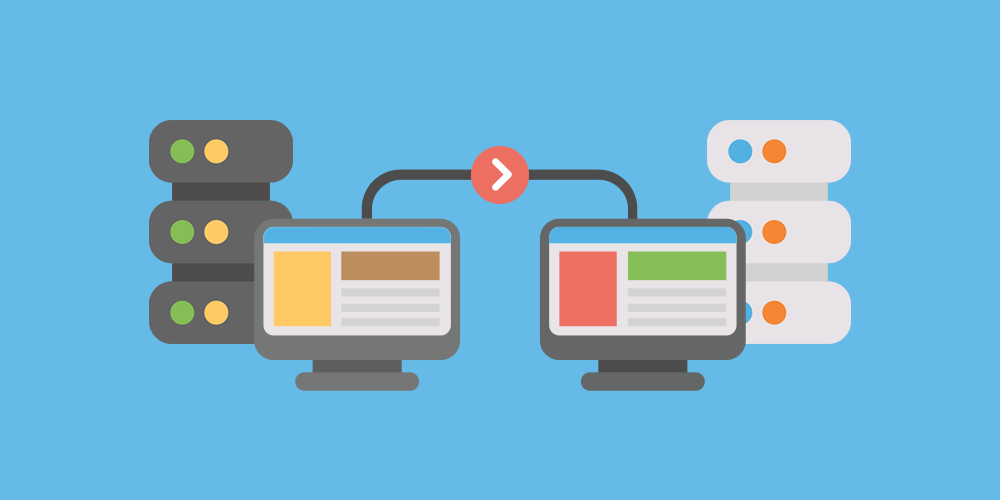
WordPress isn’t flawless. Before making a major WordPress theme change, back it up. If something goes wrong while changing the theme, you can restore your website’s content, database, media files, and settings from a backup.
Use a Backup Plugin
Using backup plugins to protect your WordPress website is smart. WordPress backup plugins offer unique functionalities to meet your backup needs.
The approach is simple: install, and activate your preferred backup plugin. After the initial stages, carefully follow the setup instructions, and create a complete website backup. Automated backup scheduling is a major benefit of these plugins.
Manual Backup
For hands-on website security management, manual backup is an option. It takes more time and effort, but it gives you unmatched backup control. You can carefully download all of your website’s files using a reliable FTP application or hosting management panel.
Consider learning how to export your important WordPress database using phpMyAdmin or similar tools. This phase may lengthen the backup process, but it allows for more flexibility and supervision.
Staging Sites: Test Your Changes First
A staging site lets you test and change WordPress themes without affecting your live website. It’s a great place to test WordPress theme changes and configurations before installing them on your main site.
Hosting Provider Staging
Optimizing your workflow typically requires using hosting provider tools and services. In this scenario, staging capabilities offered by some hosting providers can simplify website management.
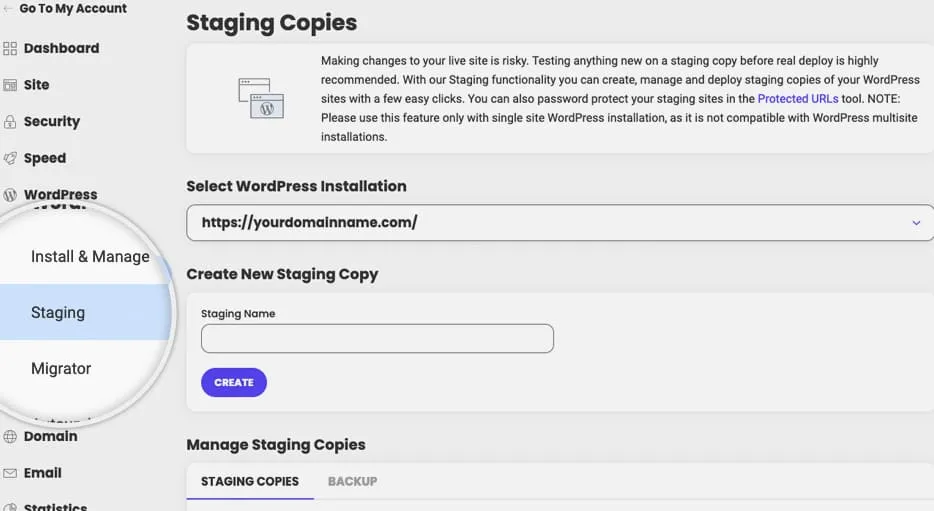
A good first step is to ask your hosting provider about this beneficial service. A simple question can reveal if your hosting package supports staging. Don’t hesitate to ask your provider additional questions. After all, you are the customer.
If your hosting service has this tool, you must understand its benefits for website management. Your hosting provider will likely provide instructions for constructing a staging site after confirmation.
Staging Plugins
Staging WordPress plugins fill the gap when your hosting provider doesn’t offer staging. These dynamic plugins let you easily construct staging sites regardless of your hosting configuration. WP Staging, All-in-One WP Migration, and Duplicator are popular plugins.
Using these plugins, you can clone your site. The staging site lets you test new features, make modifications, and fix bugs before launching your website to production. The staging site typically has different subdomain, for example:
https://staging.yourdomain.com
Child Themes: Protecting Customization
Child themes are useful for keeping customizations when changing WordPress themes. A child theme lets you customize its parent theme’s functionality and style without impacting its core files.
Create the Child Theme
Manual orchestration is one way to create a child theme that reflects the website design’s aesthetic expression.
Create a new directory in the themes folder to house your child theme’s essence. This special place will showcase your website’s distinctive features.
In this area, a carefully prepared style.css file brings the child theme to life. This crucial document references the parent theme, and contains a precisely defined structure. Among other things, the file contains the reference to the parent theme:
Template: parent-theme-slugCustomize the Child Theme
The WordPress ecosystem, always thinking of its users, simplifies child theme creation. Avant-garde plugins like the Child Theme Configurator bridge aim and implementation. This modern method reduces errors and saves time that could be better spent on personalized creativity.
When the child theme appears, personalization begins; when you activate the child theme, its wings open, providing necessary upgrades to the parent theme.
Switch to the Child Theme
In the child theme paradigm, customizations are separated from the parent theme’s base. This border protects your art from parent theme modifications. Your website retains its character when the parent theme upgrades.
The transition to the child theme is smooth with your customizations. The time has come to reveal your creation and confidently switch to the child theme. The beauty is that your website’s style, functionality, and attitude remain consistent regardless of the parent theme.
Theme Switching Plugins
Use a theme-switching plugin to change WordPress theme smoothly. These plugins let you examine new themes while retaining your existing theme for visitors. Thus, you can adjust the new theme at your leisure before launching it.
Front-runners include “Theme Switcha“.
Best Content Backup and Migration Plugins
To ensure content security and consistency during theme changes and other website changes, use backup and migration plugins. With these plugins, you may back up and move your website’s settings, plugins, content, and themes to another server.
Let’s examine some popular content transfer and backup plugins that might help you protect your work.
UpdraftPlus

One of the most popular backup plugins for WordPress is called UpdraftPlus. With its easy-to-use interface, you can schedule automatic backups of your files and database and save them in several distant destinations, including Dropbox, Google Drive, or your favorite cloud storage. If problems occur when changing themes, you can quickly go back to a prior backup.
All-in-One WP Migration

In times of inevitable and rewarding WordPress theme changes, the All-in-One WP Migration plugin is invaluable. This adaptable tool connects your site to your desired topic horizon.
Its strength is its broad approach—it covers your entire digital world. Intricate database and rich tapestry of media assets, plugins, and themes that make up your website’s identity—this plugin cares for every aspect. The All-in-One WP Migration plugin is simple but powerful: export and import.
Duplicator

Duplicator is a migration and backup plugin that makes it easier to duplicate your website for testing. Your complete website can be packaged, downloaded as a ZIP file, and installed on a separate server or in your staging environment. This is a great way to make sure that when the theme changes, the content stays consistent.
Duplicate Post

The Duplicate Post plugin is adaptable beyond its intended use. Although not designed as a migration plugin, its features are essential for WordPress theme changes. This plugin becomes a digital artisan who can precisely copy sites and articles.
The appeal of Duplicate Post is its capacity to revive your prior work. It replicates your intricate content tapestry for a smooth transition to your new theme. This is effective for retaining complex content structures. The plugin’s simple mechanics let you reproduce gracefully.
Widget Importer & Exporter
The melody of your layout is widgets. Like a conductor, the Widget Importer & Exporter plugin guides theme transitions in this orchestration.
Dynamic widgets shape your site’s visual and functional personality, and are crucial. This plugin preserves Widgets when changing WordPress theme.
The Widget Importer & Exporter plugin enhances design fidelity. It lets you export widget configurations from your theme, capturing their essence and layouts.
Conclusion
Changing WordPress themes improves your website’s appearance and functionality. With proper planning, you can change WordPress themes without losing your content or customizations.
Use reliable plugins to back up your website, staging environments for risk-free testing, child themes to protect customizations from future updates, and theme-switching plugins for additional layer of security. Don’t forget to choose the best content backup and migration plugins.
Following these approaches, you may confidently refresh your website’s look while preserving your hard-earned content, giving visitors a seamless experience.


